
How to Install 20x20x1 Air Filter: Step-by-Step Guide
Share
How to Install 20x20x1 Air Filter: Step-by-Step Guide
Is Your 20x20x1 Filter the Right Size? Check Before Installing
Before installing your new filter, confirm you have the correct size. A 20x20x1 filter has actual dimensions of 19.5" x 19.5" x 0.75" - not exactly 20x20x1. Installing the wrong size can damage your HVAC system and reduce air quality effectiveness. Use our filter size guide to verify your measurements if you're unsure.
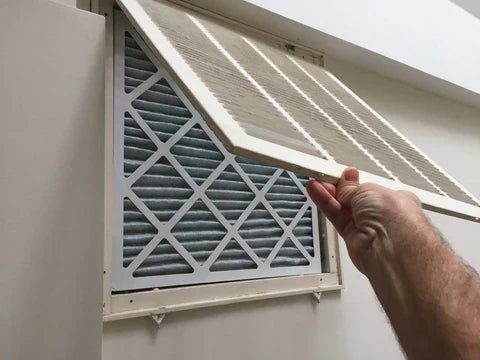
Complete 20x20x1 Installation Video Guide
Video highlights: Watch our 3-minute step-by-step demonstration showing exactly how to remove, inspect, and install your 20x20x1 filter safely.
Step-by-Step Installation Instructions
Before You Start: Safety First
✅ Turn off your HVAC system (thermostat to "OFF")
✅ Gather tools: None needed for most installations
✅ Have new filter ready: Remove from packaging
✅ Note the date: Mark your calendar for next replacement
Step 1: Locate Your 20x20x1 Filter
Most common locations:
- Return air grille: Wall or ceiling mounted (most common for 20x20x1)
- Furnace cabinet: Near the blower compartment
- Air handler: In the return air duct
Pro tip: If you can't find it, follow the large return air duct from your indoor unit - the filter is usually where this duct enters the system.
Step 2: Remove the Old Filter
- Open the filter compartment (may require removing screws or lifting a hinged door)
- Slide out the old filter - note which direction the airflow arrow points
-
Check the filter condition:
- Light gray/dirty = normal replacement time
- Dark brown/black = overdue for replacement
- Bent or damaged = replace immediately
⚠️ Important: Take a photo of the airflow arrow direction before removing the old filter.
Step 3: Inspect the Filter Compartment
Check for:
- Dust buildup around the filter slot
- Proper fit - should be snug but not forced
- Damage to the filter housing
- Obstructions that might block airflow
Clean if needed: Vacuum any dust from the filter tracks and surrounding area.
Step 4: Install Your New 20x20x1 Filter
- Check the airflow arrow on your new filter
- Align the arrow with airflow direction (toward the furnace/air handler)
- Slide filter into place - should fit snugly without forcing
- Ensure complete seal - no gaps around the edges
- Close the filter compartment securely
Critical: The airflow arrow must point toward your furnace/air handler, NOT toward the return air duct.
Step 5: System Restart and Verification
- Turn your HVAC system back on
- Listen for unusual noises (may indicate improper installation)
- Check airflow at vents (should feel normal within 5 minutes)
- Mark your calendar for next replacement (60-90 days)
20x20x1 Filter Sizing Tips
Measuring Your Current Filter
- Remove existing filter and measure actual dimensions
- 20x20x1 actual size: 19.5" x 19.5" x 0.75"
- Don't force a filter that doesn't fit properly
Common Sizing Mistakes
❌ Assuming nominal size is exact (20x20x1 vs actual 19.5x19.5x0.75)
❌ Mixing up width and height (20x20 is square, so this doesn't apply)
❌ Wrong thickness (1-inch vs 2-inch vs 4-inch)
❌ Forcing oversized filters (can damage the housing)
What If Your Filter Doesn't Fit?
- Too loose: Check if you have the wrong size
- Too tight: Don't force it - verify dimensions
- Wrong thickness: Measure the filter slot depth
- Bent edges: Replace with properly sized filter
Shop correctly sized 20x20x1 filters →
Troubleshooting Common Installation Issues
Problem: Filter Won't Slide In
Possible causes:
- Filter is too large (check actual vs nominal dimensions)
- Old filter left debris in tracks
- Filter housing is damaged
Solutions:
- Measure your filter slot carefully
- Clean filter tracks thoroughly
- Verify correct 20x20x1 size
Problem: Poor Airflow After Installation
Possible causes:
- Filter installed backwards (airflow arrow wrong direction)
- MERV rating too high for your system
- Filter compartment not sealed properly
Solutions:
- Check airflow arrow direction (should point toward furnace)
- Consider lower MERV rating (MERV 8 vs MERV 13)
- Ensure filter compartment is fully closed
Problem: Filter Keeps Falling Out
Possible causes:
- Filter is too small
- Filter tracks are damaged
- Compartment door doesn't close properly
Solutions:
- Re-measure your filter slot
- Check for bent or broken filter tracks
- Ensure compartment door latches securely
Problem: System Won't Start After Installation
Possible causes:
- Filter compartment door not fully closed
- Safety switch activated
- Loose electrical connections (rare)
Solutions:
- Ensure filter door is completely closed and latched
- Check for safety switches that prevent operation with open doors
- Contact HVAC professional if electrical issues suspected
MERV Rating Considerations for Installation
MERV 8: Universal Compatibility
- Best for: All HVAC systems, older units
- Airflow: Minimal restriction
- Installation: Standard process
MERV 11: Balanced Performance
- Best for: Modern systems, allergy sufferers
- Airflow: Slight restriction (most systems handle fine)
- Installation: Standard process, monitor airflow initially
MERV 13: High Efficiency
- Best for: Newer systems, maximum filtration
- Airflow: Higher restriction
- Installation: Verify system compatibility first
Not sure which MERV rating to choose? Read our complete 20x20x1 MERV comparison guide.
Replacement Schedule and Maintenance
Standard Replacement Timeline
- Every 60-90 days: Normal household conditions
- Every 30-45 days: Homes with pets, allergies, or heavy dust
- Every 30 days: Peak summer and winter months (heavy HVAC use)
Signs Your 20x20x1 Filter Needs Immediate Replacement
✅ Visual inspection: Filter appears dark gray or brown
✅ Reduced airflow: Weak airflow from vents
✅ Increased allergies: Family members experiencing more symptoms
✅ Higher energy bills: System working harder due to restriction
✅ Visible damage: Bent, torn, or collapsed filter media
Maintenance Tips for Better Performance
- Check monthly: Quick visual inspection
- Mark calendar: Set replacement reminders
- Buy in bulk: 6-pack cases save money and ensure you never run out
- Keep spares: Store filters in a clean, dry location
Professional Installation vs DIY
DIY Installation (Most 20x20x1 Filters)
✅ Good for:
- Standard return air grille locations
- Accessible filter compartments
- Homeowners comfortable with basic maintenance
✅ Benefits:
- Save service call costs
- Replace on your schedule
- Learn your system better
Professional Installation (When Needed)
🔧 Consider professional help for:
- Hard-to-reach filter locations
- Multiple filter changes throughout house
- HVAC system modifications needed
- Compatibility concerns with high-MERV filters
🔧 Professional benefits:
- System inspection included
- Proper disposal of old filters
- Verification of correct installation
- HVAC maintenance recommendations
Tools and Supplies Needed
Basic Installation (Most Cases)
- New 20x20x1 filter (shop our selection)
- No tools required for most installations
Occasional Needs
- Screwdriver: If filter compartment has screws
- Flashlight: For dimly lit areas
- Vacuum: To clean filter tracks
- Measuring tape: To verify dimensions if unsure
Safety Equipment
- Gloves: When handling dirty filters (optional)
- Dust mask: If you're sensitive to dust (optional)
Cost-Saving Tips
Bulk Purchasing Benefits
- 6-pack savings: 40-60% less than single filters
- Free shipping: Most bulk orders qualify
- Never run out: Always have replacement ready
- Consistent quality: Same filter type each time
Timing Your Purchases
- Seasonal sales: Stock up during promotions
- Subscription savings: Automatic delivery discounts
- Compare prices: Online vs retail stores
💰 Price comparison: A single 20x20x1 MERV 11 filter at home improvement stores costs $15-25. Our 6-pack cases cost $8-12 per filter with free shipping.
Related 20x20x1 Resources
Filter Selection:
Product Options:
- 20x20x1 MERV 8 Filters - Basic protection
- 20x20x1 MERV 11 Filters - Allergy defense
- 20x20x1 MERV 13 Filters - Maximum filtration
Alternative Sizes:
Ready to install your new filter? Shop our complete 20x20x1 collection with free shipping and bulk savings. Questions about installation? Contact our filter experts for personalized guidance.
New to filter replacement? Check our complete furnace filter guide for general HVAC maintenance.